Contribute Data
The BCL uses GitHub repositories to manage measure and component content. The list of repos currently providing content to the BCL can be found on the Dashboard page.
The steps to Contribute Content to the BCL are as follows:
- Organize your data in a GitHub Repo
- Register your Repo with the BCL
- Configure your Repo to automatically add new releases to the BCL
- Create a release of your Repo
Expand the sections below to learn more about the process. Users unfamiliar with GitHub may want to watch the tutorial video created by Helix Energy Partners.
The first step toward contributing your data is to properly organize it in a GitHub repository.
Measures
Measure repositories should be structured as an OpenStudio Extension Gem .
- Follow the directions to initialize a new extension gem for your measures
- Measures should be placed in the lib/measures/ directory within the repo structure.
- While nested directories can be used to organize your measures within the lib/measures/ directory, the structure will be flattened when imported into the BCL. Ensure that all measure directory names are unique across the repository.
- Each measure directory should contain a LICENSE file. We suggest a BSD 3-clause license . A LICENSE.md file should also be placed in the root of your repo. The BCL can only index measures containing a license. View an example LICENSE file .
- Each measure should have a unique UUID and versionID. Use the OpenStudio Application or PAT to create new measures so that valid UUIDs are ensured. You can also consult the measure.xml schema . TEST
- Each measure should have a valid Tag classification defined in the measure.xml file. The full Measure Tags hierarchy is available on the BCL website. For example, to categorize a measure as a 'QAQC' measure, use the full hierarchy path delimited with periods, as follows:
<tags><tag>Reporting.QAQC</tag><tags> - Use the rake tasks provided by the OpenStudio Extension Gem to test your measures:
bundle exec rake openstudio:update_measures
bundle exec rake openstudio:test_with_openstudio - Commit the updates back to your repo.
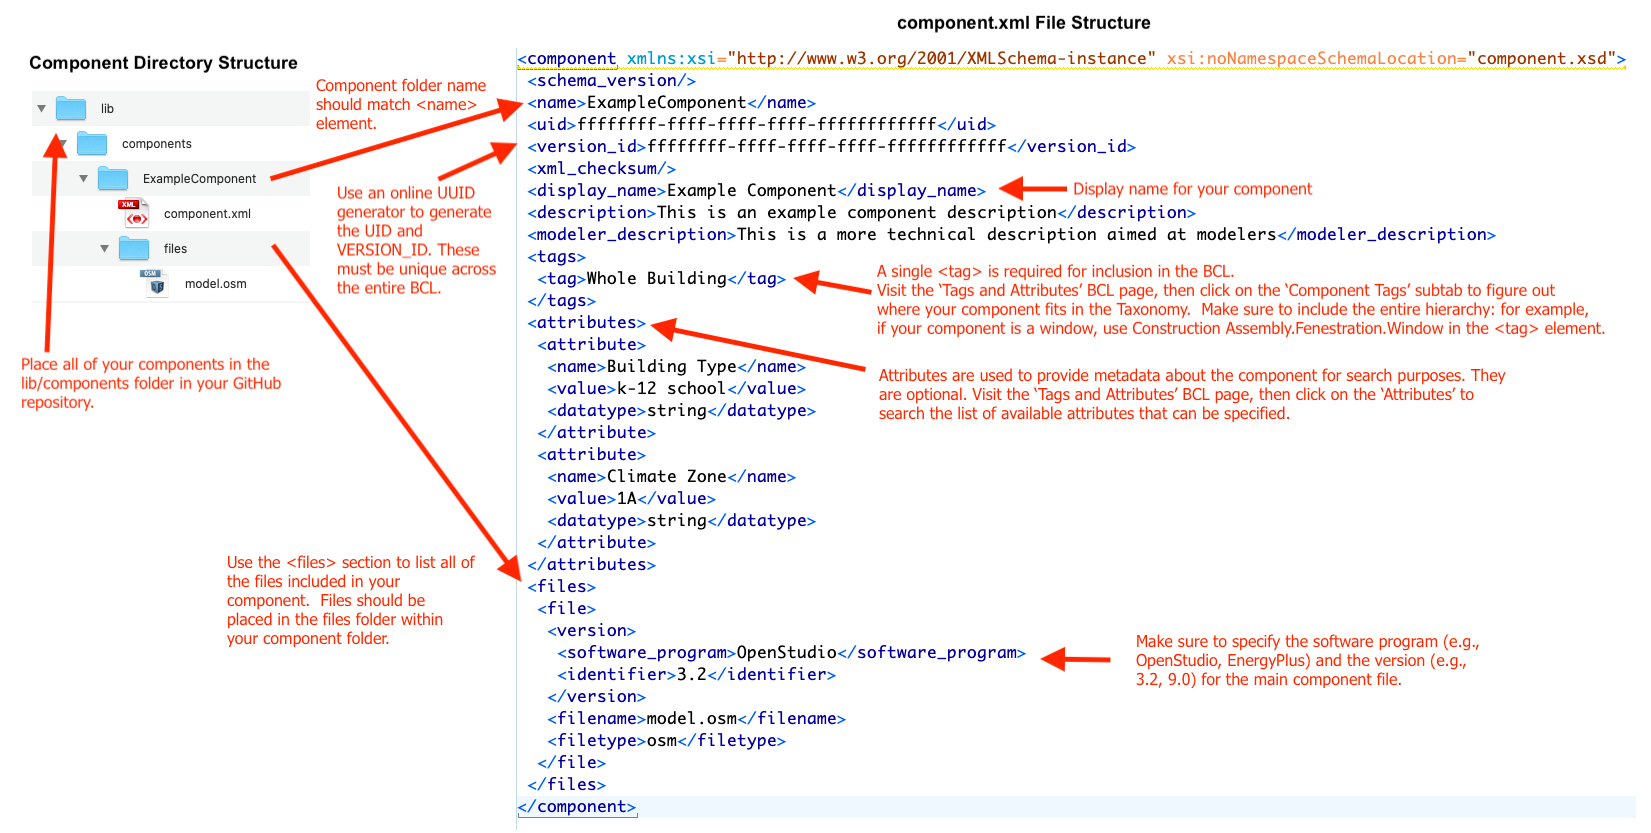
Components
The appropriate structure for component repositories is to place components in the lib/components/ directory.
There are no required tests to be run against components; however, it is recommended that the components are tested using a testing framework such as Ruby spec or py test.
Additional information:
- While nested directories can be used to organize your components within the lib/components/ directory, the structure will be flattened when imported into the BCL. Ensure that all component directory names are unique across the repository.
- Each component should have a unique UUID and versionID. Use OpenStudio to create new components so that valid UUIDs are ensured, or use an online UUID generator.
- Each component should have a valid Tag classification defined in the component.xml file. View the full Component Tags hierarchy if needed (click on the Component Tags subtab. For example, to categorize a component as a 'Window' component, use the full hierarchy path delimited with periods, as follows:
<tags><tag>Construction Assembly.Fenestration.Window</tag></tags> - Attributes can be added to a component to collect metadata about the component and help narrow down search results. View the Attributes page for a list of attributes that can be specified. (click on the Attributes subtab). You can also consult the component.xml schema .
Component Structure
The next step is to register your content repo with the BCL. This is accomplished via the BCL Manifest repo.
To register your repo:
- Fork the BCL Manifest repository.
- In the forked repo add a section to the bcl_manifest.json file with basic information about your repo:
- Repo Name
- Repo Organization
- Repo Type (measure or component)
- Repo URL
- Create a Pull Request against the original BCL Manifest develop branch containing your changes. A BCL admin will review your request and repository.
- If acceptable, the PR will be merged to the main branch.
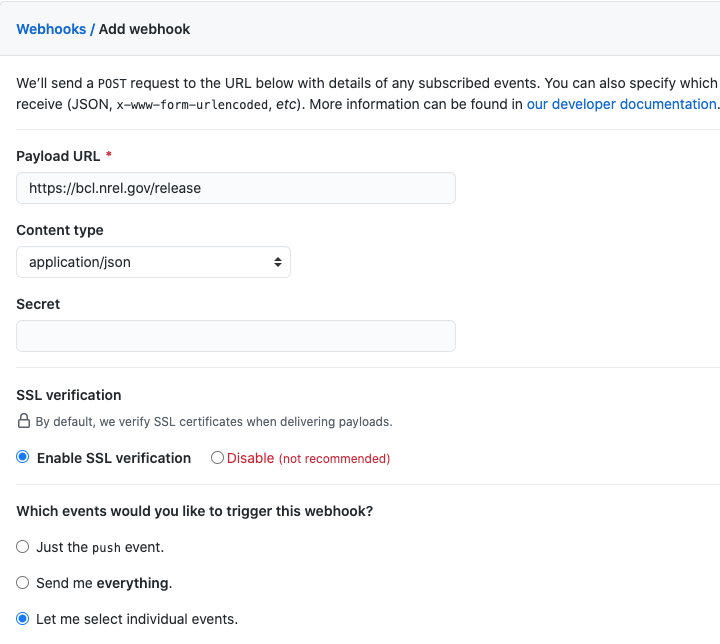
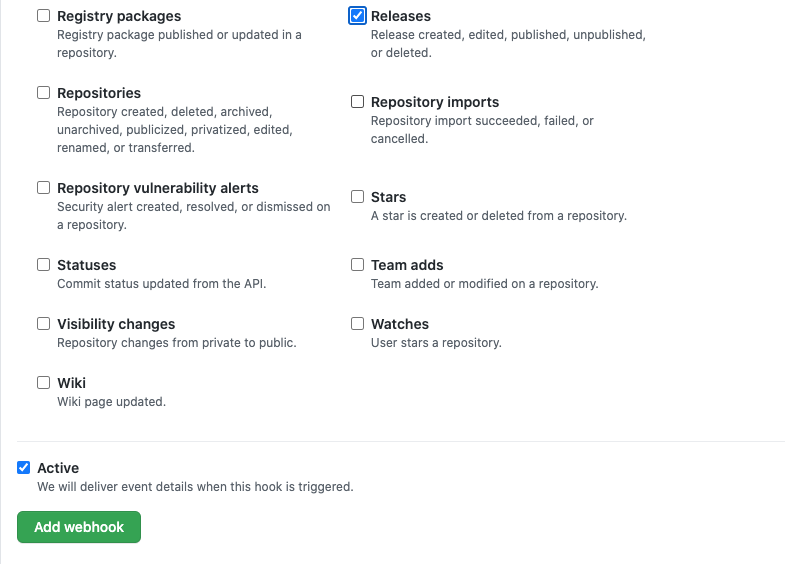
Once your repo has been registered with the BCL, you will need to setup GitHub Webhooks so that the BCL can be automatically notified when a new release is made to your repo. Once this is setup, each new release that is published from your repo will automatically be sent to the BCL to 1) add new content and 2) update existing content.
- Select webhooks from the left navigation menu on your repo's settings page, or go to settings/hooks.
- Click on the Add webhook button
- Enter the payload URL: https://bcl.nlr.gov/release
- Set the content type to: application/json
- Select Enable SSL verification
- Select Let me select individual events and click on the Releases checkbox. We will only pull content when a release is created and published.
- Click the Add webhook button at the bottom of the page.
Create a release by going to your repo's releases url.
- Click on the Draft a new release button
- Enter a title, tag version, name, and description.
- Do not check the This is a pre-release checkbox if you want your release added to the BCL.
- When you are ready click on the Publish release button
The BCL will then index your new content. To see the status of your repo, including indexing errors, visit the BCL Dashboard page and click on your repo.
Repeat these steps each time you would like to add or update content on the BCL.